Getting started with Cerynix on-prem
This is the complete, end-to-end guide for running Cerynix on your own server. It is split into three phases you follow in order — you should be able to go from a bare Linux VM to a fully configured instance without surprises:
- Phase 1 — Install the product on your server.
- Phase 2 — Activate your license key.
- Phase 3 — Configure everything: onboarding, users & roles, connectors and the GRC loop.
Every command below is copy-paste ready and each step states the expected result so you can confirm you are on track before moving on. The product is fully self-hosted — no cloud dependency and no phone-home.
Also install
minisign first — the installer
verifies the download's signature before running anything and will refuse to
proceed without it (this is the supply-chain check, see below):
apt-get install -y minisign (Debian/Ubuntu) ·
apk add minisign (Alpine) ·
dnf install -y minisign (RHEL/Fedora) ·
brew install minisign (macOS).
Install on your server
Two paths lead to the same running instance. Use the quick install
(one command) unless you need the finer control of the manual path
(air-gapped images, a custom TLS certificate at bring-up, or a review of
every value written to .env).
Quick install (one command)
Cerynix ships a clone-free bootstrap from your self-hosted download
endpoint. One command fetches and verifies the on-prem bundle, unpacks it,
and hands off to the bundled install.sh — which
takes a clean host all the way to a running, admin-ready instance. No
repository or registry access is required on the server.
Prerequisites
- A Linux VM (Ubuntu 24.04 LTS tested), x86-64, with ≥ 4 GB RAM and ≥ 20 GB free disk.
- Docker Engine + the Docker Compose v2 plugin, with the daemon running and reachable by the user running the command.
curl,tar,gzip— used by the bootstrap; andopenssl, used by the installer to generate secrets.age(optional) — ifage-keygenis present the installer also creates a backup-encryption key; otherwise it skips it and you can set up backups later.
Outbound network access the server needs
Cerynix has no cloud dependency at runtime — no phone-home, no licence check-in. Installation is different: the images are built on your box, so the server needs outbound access while it installs. Your network team will ask for this list first, so here it is in full.
| Destination | Port | Why | When |
|---|---|---|---|
dl.cerynix.com | 443 | Signed bundle + detached signature | Install / upgrade only |
registry-1.docker.io, auth.docker.io, production.cloudflare.docker.com | 443 | Base images: postgres, redis, minio, nginx, python, node | Install / upgrade only |
Your distro mirrors (archive.ubuntu.com, security.ubuntu.com) | 80, 443 | OS packages the images build against | Install / upgrade only |
pypi.org, files.pythonhosted.org, registry.npmjs.org | 443 | Application dependencies, pinned by lockfile | Install / upgrade only |
docker save /
docker load): the images are carried in and nothing is
fetched.
grep -m1 GETSH_REVISION= get.sh     # e.g. rev 2026-08-17 — verifies minisign signature
grep -c 'minisign -V' get.sh # must be >= 1; 0 means the copy does NOT verifyGETSH_REVISION line is from before
2026‑08‑17 — re-download it. The served version is always current.
curl -fsSL https://dl.cerynix.com/get.sh -o get.sh
head -1 get.sh | grep -q '^#!' \
  && echo "OK: this is the installer" \
|| { echo "NOT AUTHORISED — this is not a script:"; head -3 get.sh; exit 1; }curl -fsSL … | bash
exits 0 and feeds HTML to your shell. You get a syntax error
instead of "you have no access". That holds for any vendor,
ours included.
One command
Run this on the server, substituting the three angle-bracket values. Anything
after bash -s -- is passed straight through to the
installer:
curl -fsSL https://dl.cerynix.com/get.sh | bash -s -- \
  --hostname <server-host> \
  --admin-email <email> \
--org "<Company>"https://dl.cerynix.com/get.sh; the bundle it fetches is at
https://dl.cerynix.com/cerynix-onprem.tar.gz. Opening
https://dl.cerynix.com/ in a browser shows this same command.
Your Cerynix contact will confirm the exact download host for your account. To run
a saved copy of the bootstrap against a specific endpoint, set
CERYNIX_DL=https://<host>.
You can pass more of the installer's flags on the same line (e.g.
--country).
Do not pass --admin-password on the command line — it
lands in your shell history and the process list. Omit it and the installer
auto-generates a strong password and prints it once at the end (the recommended
path). If automation must set the password, put it in a file and use
--admin-password-file PATH (or
CERYNIX_ADMIN_PASSWORD_FILE) so it never appears as an
argument. Store admin credentials in a password manager and prefer a long
passphrase for privileged accounts.
Verify authenticity
The bootstrap does this for you automatically: before it
unpacks anything, it downloads the bundle's detached signature and
verifies it against a signing key baked into get.sh.
A tampered bundle, a compromised download host, or a
man-in-the-middle makes verification fail closed — nothing is
extracted or run. This requires minisign on
the server (apt-get install -y minisign, or
dnf/apk/brew);
if it is missing the install refuses rather than skipping the check.
Security-conscious admins can confirm the same signature by hand before running anything. Download all three artifacts, then verify:
curl -fsSLO https://dl.cerynix.com/cerynix-onprem.tar.gz
curl -fsSLO https://dl.cerynix.com/cerynix-onprem.tar.gz.minisig
minisign -Vm cerynix-onprem.tar.gz \
-P RWTV2ireCQ47CjvVn21cqKEscMzGdFUh9KJnQEyJVVRev3tntTailjAeRWTV2ireCQ47CjvVn21cqKEscMzGdFUh9KJnQEyJVVRev3tntTailjAe
(minisign / Ed25519, key ID 0A3B0E09DE2ADAD5). It is
also published inside https://dl.cerynix.com/get.sh (see
CERYNIX_PUBKEY). A successful verify prints
Signature and comment signature verified. If it does
not verify, do not run the bundle — contact your Cerynix
security contact.
| Flag | Env var | Meaning |
|---|---|---|
--hostname | CERYNIX_HOSTNAME | Hostname or IP clients use (drives TLS SAN + CORS + API URL) |
--tls-san | — | Extra certificate SANs, comma-separated. Bare values are classified for you (alt.internal,10.0.0.10 → DNS:alt.internal,IP:10.0.0.10). The hostname, the primary interface address and 127.0.0.1 are already included — use this for anything beyond them. |
--admin-email | CERYNIX_ADMIN_EMAIL | First admin login email |
--org | CERYNIX_ORG | Organization / company name |
--admin-password | CERYNIX_ADMIN_PASSWORD | First admin password (omit to auto-generate — passing it leaks to shell history / process list) |
--admin-password-file | CERYNIX_ADMIN_PASSWORD_FILE | Read the first admin password from a file (non-leaking path for automation) |
--country | CERYNIX_COUNTRY | Organization country, ISO code or EU (default EU) |
--no-backup-key | — | Skip creating the age backup key |
--force | — | Regenerate .env even if one exists (rotates all secrets) |
--repair | — | Rebuild + restart + self-test an existing install, without rotating secrets |
-y, --yes | — | Never prompt; fail if a required value is missing |
What it does automatically
- Downloads the bundle from your endpoint, verifies it is a valid gzip/tar, and extracts it into an install directory (default
./cerynix-onprem; override withCERYNIX_HOME). - Checks prerequisites (docker, compose v2, openssl, a live daemon) and warns if ports 80/443 are already in use.
- Generates all secrets —
SECRET_KEY, a distinctDATA_ENCRYPTION_KEY(at-rest encryption), both DB passwords, and the object-store password — as shell-safe values (nothing to copy by hand). - Writes a hardened production
.env(chmod 600): production mode, RLS on, self-registration off, demo data off. - Builds and starts the whole stack (
docker compose … up -d --build). - Waits for the API to report healthy (migrations + first-boot seed of reference data); on timeout it dumps recent
api/dblogs and exits non-zero. - Bootstraps your first admin + organization (
app.scripts.create_admin) and runs a browser-path self-test. - Prints the login URL, admin email, and — if it generated one — the admin password.
==> ... build + health + self-test pass ...
Cerynix is ready.
  URL:      https://<server-host>/
  Admin:    <email>
  Password: <printed here if auto-generated>
./cerynix-backup.key off the
server (into a vault / password manager) and delete the on-box copy. It is
the only way to decrypt backups and must not live on the box it protects.
Everything else is done — go to Phase 2.
Manual install (advanced)
The steps below do by hand exactly what the quick install automates.
Reach for them only when you need finer control — an air-gapped box, a
custom TLS certificate at bring-up, or a review of every value written
to .env. The result is identical to the quick install;
if you used the one command above, skip straight to
Phase 2.
1 · Prerequisites & code
Modern Linux x86-64 host with Docker Engine 24.x and the Docker Compose v2 plugin. The core app needs no external network at runtime.
| Requirement | Minimum | Recommended |
|---|---|---|
| Docker Engine | 24.x | latest stable |
| Docker Compose | v2 (plugin form) | latest |
| RAM | 4 GB | 8 GB |
| Disk | 20 GB free | 50 GB+ |
| CPU | 2 vCPU | 4 vCPU |
docker --version
docker compose version          # must succeed; v2 plugin form or newer (v5 is fine)
Install age on the box for encrypted backups, then get the code:
sudo apt-get update && sudo apt-get install -y age
sudo install -d -o "$USER" /opt/cerynix
# Download the SIGNED bundle and verify it before unpacking. The manual path
# uses the same artifact as the quick install — no repository access is needed
# on the server, and none is granted.
curl -fsSLO https://dl.cerynix.com/cerynix-onprem.tar.gz
curl -fsSLO https://dl.cerynix.com/cerynix-onprem.tar.gz.minisig
minisign -Vm cerynix-onprem.tar.gz -P RWTV2ireCQ47CjvVn21cqKEscMzGdFUh9KJnQEyJVVRev3tntTailjAe \
  || { echo "SIGNATURE CHECK FAILED — do not unpack"; exit 1; }
tar xzf cerynix-onprem.tar.gz -C /opt/cerynix/app --strip-components=0
cd /opt/cerynix/app
Everything below runs from /opt/cerynix/app.
--build) — there is
no registry to pull from. On an air-gapped box, build on a connected host,
docker save the images, copy the tarball across,
docker load, then run the bring-up without --build.
2 · Generate secrets
The production overlay and the app refuse to start on placeholder
secrets. Generate real ones and keep the output for the matching
.env key:
openssl rand -hex 32        # SECRET_KEY        (JWT signing + at-rest key; >= 32 chars)
openssl rand -base64 24     # POSTGRES_PASSWORD (bootstrap superuser)
openssl rand -base64 24     # APP_DB_PASSWORD   (non-superuser cerynix_app role, RLS)
openssl rand -base64 24     # S3_SECRET_KEY == MINIO_ROOT_PASSWORD (use the SAME value for both)
Backup encryption key — generate OFF the server (e.g. on an admin laptop):
age-keygen -o cerynix-backup.key
# prints: Public key: age1........ <- the RECIPIENT (public) keyage1... public key goes on the box
(BACKUP_AGE_RECIPIENT). The cerynix-backup.key file is
the private identity — keep it offline (vault / password manager). It
never touches the server. Losing it means backups can never be decrypted.
3 · Configure .env for production
Start from the on-prem template (prod-safe defaults + explicit
CHANGE ME markers) and paste in the secrets from step 2:
cp .env.onprem.example .env
chmod 600 .env
$EDITOR .env| Key | Value |
|---|---|
SECRET_KEY | the openssl rand -hex 32 output |
POSTGRES_PASSWORD | an openssl rand -base64 24 output |
APP_DB_PASSWORD | a different openssl rand -base64 24 output |
S3_SECRET_KEY and MINIO_ROOT_PASSWORD | the same rand -base64 24 value (must match) |
DATABASE_URL | replace the password portion to match APP_DB_PASSWORD |
BACKUP_AGE_RECIPIENT | the age1... public key from step 2 |
CORS_ORIGINS | your https:// hostname(s), comma-separated — never * |
TLS_CN / TLS_SAN | how clients reach the box (hostname and/or IP) |
The docker-compose.prod.yml overlay hard-enforces
the production-safe flags regardless of .env:
ENVIRONMENT=production,
SEED_DEMO_DATA=false,
REGISTRATION_ENABLED=false and
DB_RLS_ENABLED=true (Postgres Row-Level Security on;
the app connects as the non-superuser cerynix_app role).
.env file contains live secrets. The repo's
.gitignore already excludes it — keep it that way.
4 · TLS
The bundled nginx reverse proxy terminates TLS on
:443 and serves the web app and API under one origin.
On first boot it auto-generates a self-signed certificate from
TLS_CN / TLS_SAN. Pick one option.
Option A — self-signed (internal network, no public DNS). The proxy already self-signs on boot; to mint a longer-lived cert and install it:
openssl req -x509 -newkey rsa:4096 -nodes -days 3650 \
  -keyout privkey.pem -out fullchain.pem \
  -subj "/CN=cerynix.internal" \
  -addext "subjectAltName=DNS:cerynix.internal,IP:10.0.0.10"

docker compose cp privkey.pem   proxy:/certs/privkey.pem
docker compose cp fullchain.pem proxy:/certs/fullchain.pem
rm -f privkey.pem fullchain.pem   # keep no plaintext key on disk
Or paste the same PEM cert + key at runtime via Settings → TLS in the web UI (validated, written to the volume — never stored in the database).
Option B — Let's Encrypt (public domain). Point an A record at the server, confirm it resolves, then issue + install:
sudo DOMAIN=cerynix.example.com EMAIL=you@example.com \
  scripts/deploy/renew-cert.sh
5 · Bring the stack up
Build and start with the base file plus the production overlay, stamping build provenance:
GIT_COMMIT=$(git rev-parse HEAD) \
BUILD_ID=$(date -u +%Y%m%d%H%M) \
BUILD_DATE=$(date -u +%Y-%m-%dT%H:%M:%SZ) \
  docker compose -f docker-compose.yml -f docker-compose.prod.yml up -d --build
On first boot: Postgres initialises an empty volume and creates the
non-superuser cerynix_app role; the
api entrypoint runs
alembic upgrade head and seeds reference data only
(RBAC, control library, country profiles, incident playbooks — no demo org);
MinIO creates the evidence bucket.
docker compose ps shows SEVEN services running:

  db      Up (healthy)     PostgreSQL
  redis   Up (healthy)     queue + rate limiter
  minio   Up (healthy)     evidence object store
  api     Up (healthy)     FastAPI backend
  worker  Up               background jobs   <-- no healthcheck by design
  web     Up               Next.js console   <-- no healthcheck by design
  proxy   Up               nginx/TLS         <-- no healthcheck by design

Four report (healthy) because they define a healthcheck; worker, web and proxy
show plain "Up". That is expected, not a partial start: only the four services
something else waits on need a readiness gate. A one-shot minio-init container
creates the evidence bucket and then exits — a completed minio-init is correct.

The api log prints "Starting API" after "alembic ... upgrade" and "seed".
6 · Health & RLS check
curl -sf http://127.0.0.1:8000/healthz && echo " LIVE"     # process up
curl -sf http://127.0.0.1:8000/readyz  && echo " READY"    # 200 only when DB reachable
curl -skf https://127.0.0.1/healthz    && echo " PROXY-OK" # via the TLS proxy
install.sh already runs the RLS check for you after startup and
prints the result. To re-run it on demand — or if you installed by hand — run the
same script the CI and staging pipelines use, inside the API container so it
tests the exact connection the application makes:
docker compose cp scripts/deploy/verify-rls.py api:/tmp/verify-rls.py
docker compose exec -T api python /tmp/verify-rls.pyLIVE, READY and PROXY-OK all print, and verify-rls.py exits 0 with a line like: RLS enforced: role 'cerynix_app' is NOSUPERUSER + NOBYPASSRLS; N tenant tables ENABLED+FORCED with the isolation policy; behavioural probe passed ... Any failure instead prints "RLS ENFORCEMENT CHECK FAILED:" and lists each gap.
rolsuper
A one-line select rolsuper from pg_roles only proves the app role is not a
superuser. That is necessary but nowhere near sufficient: it says nothing about
rolbypassrls (an independent attribute that bypasses RLS on its own),
whether any tenant-isolation policy exists, whether FORCE ROW LEVEL
SECURITY is set, or whether the policy predicate actually hides another
tenant's rows. verify-rls.py checks all four, including behaviourally on a
throwaway probe table, and never writes to a real tenant table.
docker compose logs db api. Do
not point DNS/clients at the box until readyz is 200.
7 · First-admin bootstrap
A fresh production instance has reference data but no user accounts and
REGISTRATION_ENABLED=false.
app.scripts.create_admin creates the org + admin from
environment variables and is idempotent (if the admin email already
exists it exits 0 without changes):
docker compose -f docker-compose.yml -f docker-compose.prod.yml exec \
  -e BOOTSTRAP_ADMIN_EMAIL='admin@example.com' \
  -e BOOTSTRAP_ADMIN_PASSWORD='<a strong password, >= 10 chars>' \
  -e BOOTSTRAP_ADMIN_NAME='Jane Admin' \
  -e BOOTSTRAP_ORG_NAME='Example Company SIA' \
  -e BOOTSTRAP_ORG_COUNTRY='LV' \
api python -m app.scripts.create_admin[bootstrap] created org 'Example Company SIA' (slug=example-company-sia) and admin user admin@example.com. Log in at the web UI to continue.
Exit codes: 0 created or already present,
2 missing/invalid config, 1
other failure. After bootstrapping, add team members by invite
(Phase 3) — self-registration stays closed.
Activate your license
Licensing is per deployment and works entirely offline: there is no license server to run and no phone-home. The vendor holds an Ed25519 private signing key; every build embeds the matching public key and verifies your license locally. A tampered or forged key is rejected.
Step 1 · You start in Evaluation
With no key set, the product runs in the Evaluation edition: fully functional — all features on, no hard limits — and clearly labelled as unlicensed. You can install, onboard and use the whole product before a key ever arrives. Confirm the current state:
- In the web UI: Settings → License shows the status badge
Evaluation. - Or via the API (any authenticated user):
GET /api/v1/license.
{ "edition": "evaluation", "status": "evaluation", "licensed": false, "valid": true,
  "limits": { "max_organizations": null, "max_users": null, "max_assets": null },
  "message": "No license key configured. Running in Evaluation edition." }
Step 2 · Receive your signed key
Cerynix issues you a signed license key from the vendor console
(hq.cerynix.com) and sends it to you out-of-band
(e.g. by secure email) — you receive it, you never generate it. Its format is
NS2L1.<payload>.<signature> — a token
prefix, a base64url JSON payload (your edition, who it is licensed to, issue
and expiry dates, and any per-contract limit/feature overrides), and an
Ed25519 signature over that payload. Treat it as configuration, not a secret
to rotate — but do keep it with your deployment record.
Step 3 · Activate it in the web UI
Activation is entirely in-product — no .env edit,
no restart, no SSH. Log in to your instance at
https://<server-host>/ as the admin, then go
to Settings → License. Paste the signed key (it starts with
NS2L1.) into the “Activate a license” box and
click Activate license.
The key is verified locally against the embedded public key and applied
immediately — the License page refreshes its status in place, with no restart
and no downtime. A forged or malformed key is rejected and nothing changes.
LICENSE_KEY environment variable in the install directory's
.env and restart the API — but the web-UI activation above is the
supported path and needs none of that.
Step 4 · Confirm activation
Immediately after activating, Settings → License shows your
edition (e.g. Professional), Licensed to,
Expires (date + days remaining), the key fingerprint, usage vs
limits (organizations / users) and the enabled features for your
edition. You can optionally confirm the same from the API:
curl -sk https://<server-host>/api/v1/license \
-H "Authorization: Bearer <your-access-token>"{
"edition": "professional",
"edition_label": "Professional",
"licensed": true,
"valid": true,
"status": "licensed",
"licensed_to": "Example Company SIA",
"issued_at": "2026-01-01T00:00:00Z",
"expires_at": "2027-01-01T00:00:00Z",
"days_remaining": 180,
"limits": { "max_organizations": 3, "max_users": 50, "max_assets": 5000 },
"features": [ "controls", "evidence", "risk", "tasks", "assets", "exposure",
"suppliers", "incidents", "reports", "audit", "ai_assistant",
"connectors", "webhooks", "api_tokens", "custom_branding" ],
"key_fingerprint": "…16 hex chars…",
"usage": { "organizations": 1, "users": 3 }
}
The status flips from evaluation to licensed. If the key is malformed or forged, the API rejects it and silently falls back to Evaluation with status: "invalid" and an explanatory message — re-check the pasted value if you see that.
Editions at a glance
Enforcement is conservative — only concrete numeric limits are enforced
(null = unlimited never trips), and gated premium
modules return 402 on lower editions. Evaluation and
Enterprise include every feature and are unlimited, so demos and evaluations
are never blocked.
| Edition | Intended use | Orgs | Users | Assets | Notable features |
|---|---|---|---|---|---|
| Evaluation | Trials, demos (default when unlicensed) | ∞ | ∞ | ∞ | All |
| Basic | Single small entity | 1 | 5 | 100 | Core GRC (controls, evidence, risk, tasks, assets, exposure, incidents, reports, audit) |
| Professional | Mid-size entity | 3 | 50 | 5 000 | Core + suppliers, AI assistant, connectors, webhooks, API tokens, custom branding |
| Enterprise | Large entity / MSP | ∞ | ∞ | ∞ | All, incl. SSO and MSP portfolio |
∞ (unlimited) is encoded as null. A key may override the default limits/features per contract (e.g. Professional with 100 users).
Configure everything
With the instance running and licensed, this phase gets you to a working GRC programme: sign in, complete the onboarding wizard, add your team with the right roles, connect a data source, and walk the core loop (control → evidence → approval; risk → task; incident; reports).
First login
Open https://<server-host>/ and sign in with the
admin credentials from install. On the login page, enter your organization
slug — the page renders the available sign-in methods (password always;
LDAP/SAML only if configured) — then the admin email + password. On a
self-signed cert, clients warn until you trust the cert/CA — or install a real
certificate in the UI, see 3b below.
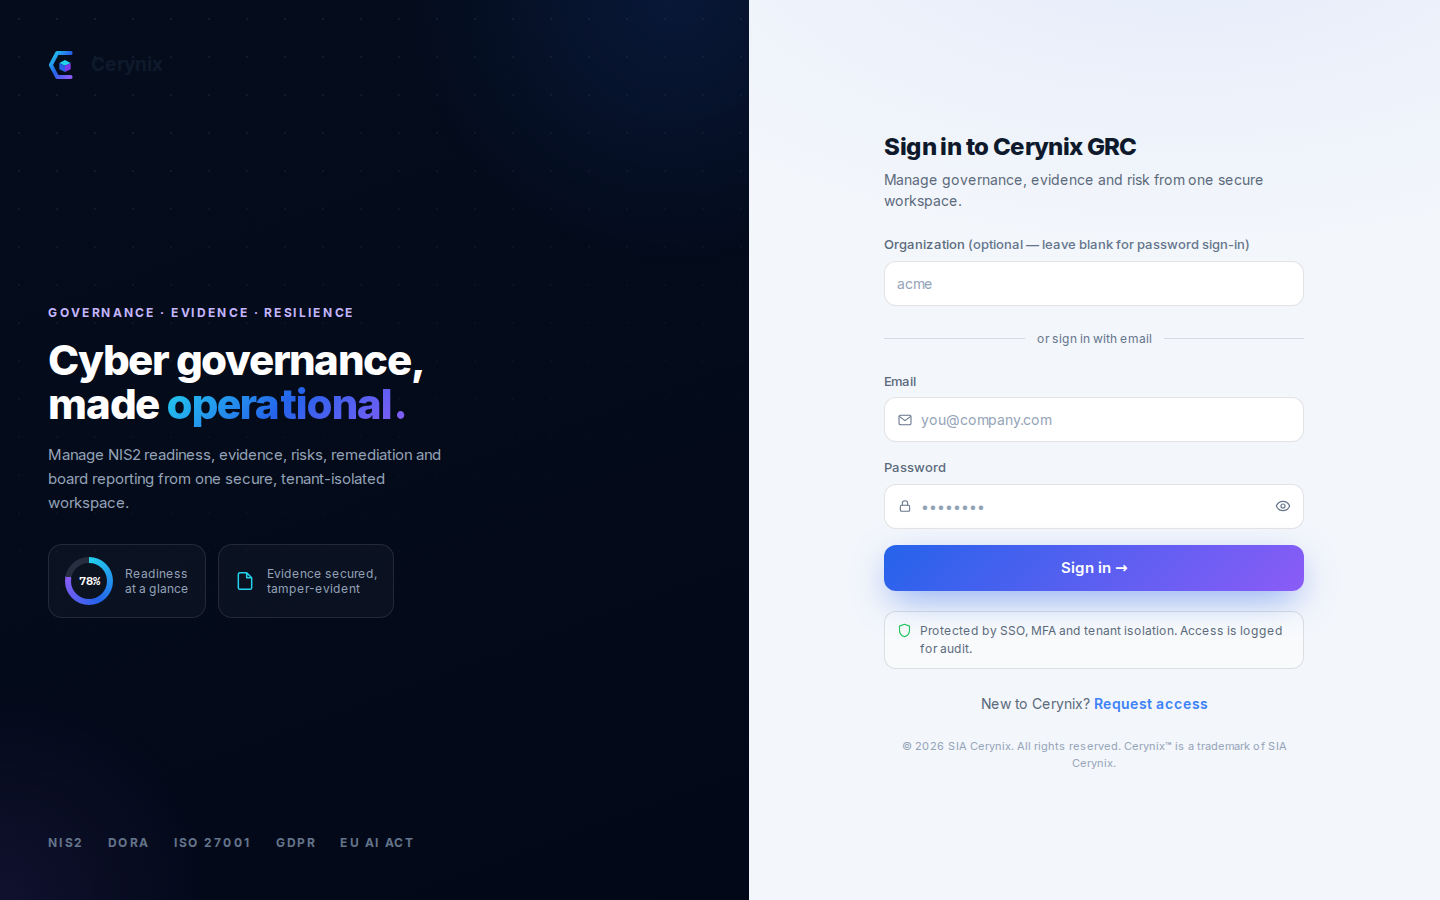
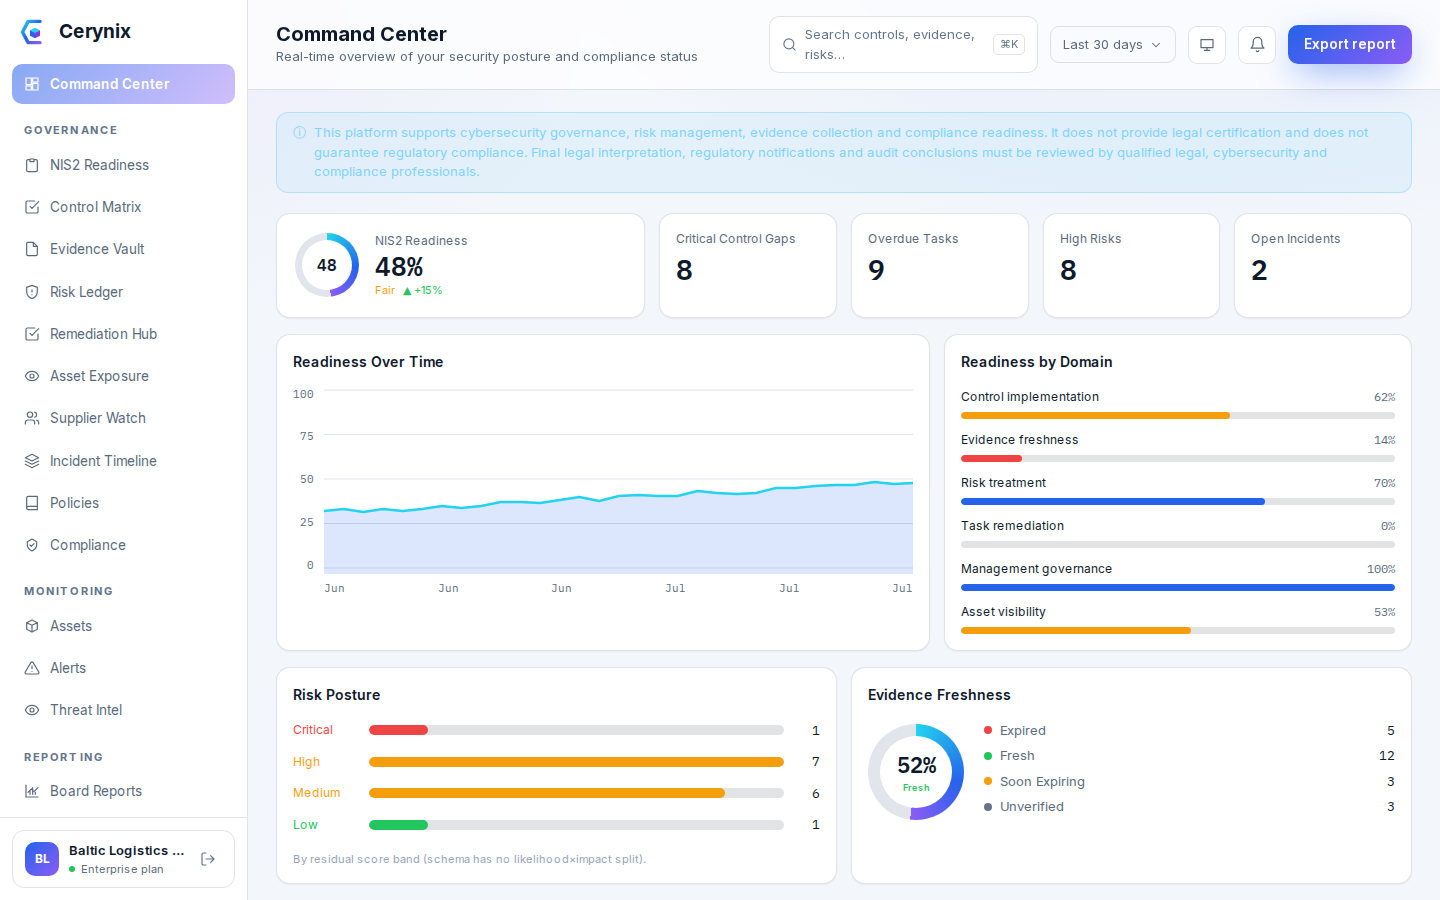
Login succeeds and the app lands on /home — the task-oriented start page,
which carries the onboarding checklist until you have completed it.

/command-center is the detailed metrics dashboard, reachable from the nav as a
drill-down; it is not the landing route. There is no /onboarding page: the wizard
is the checklist on /home (the API endpoint GET /onboarding/status does exist and
is what that checklist reads). This block used to describe both differently,
which the first pilot client reported as D-11.
POST /auth/mfa/enroll → scan the otpauth:// URI →
confirm the 6-digit code). Save the one-time backup codes — they are shown
exactly once.
Install a TLS certificate
Out of the box the built-in reverse proxy serves a self-signed certificate, so your browser warns on the first visit — that is expected on a fresh install and does not mean anything is broken. Replace it with a real certificate whenever you are ready; like everything else in this phase it is done in the web UI — no SSH, no file copying.
- Go to Settings → TLS certificate.
- Paste the PEM certificate (including the full chain) into the certificate box.
- Paste the matching unencrypted private key into the key box.
- Click Apply certificate.
The certificate and key are validated, then the built-in reverse proxy hot-reloads within about 15 seconds — no restart and no downtime. Reload the page over HTTPS and the browser warning is gone.
Settings → TLS certificate shows the active certificate's subject, issuer and
expiry; reloading https://<server-host>/ presents the trusted certificate with
no browser warning.
Onboarding wizard
Go to /onboarding. The wizard seeds the control set
and dashboards you will work from. It requires the
onboarding:manage permission (the
admin and security_manager
roles have it). No shell commands are needed — follow it to completion.
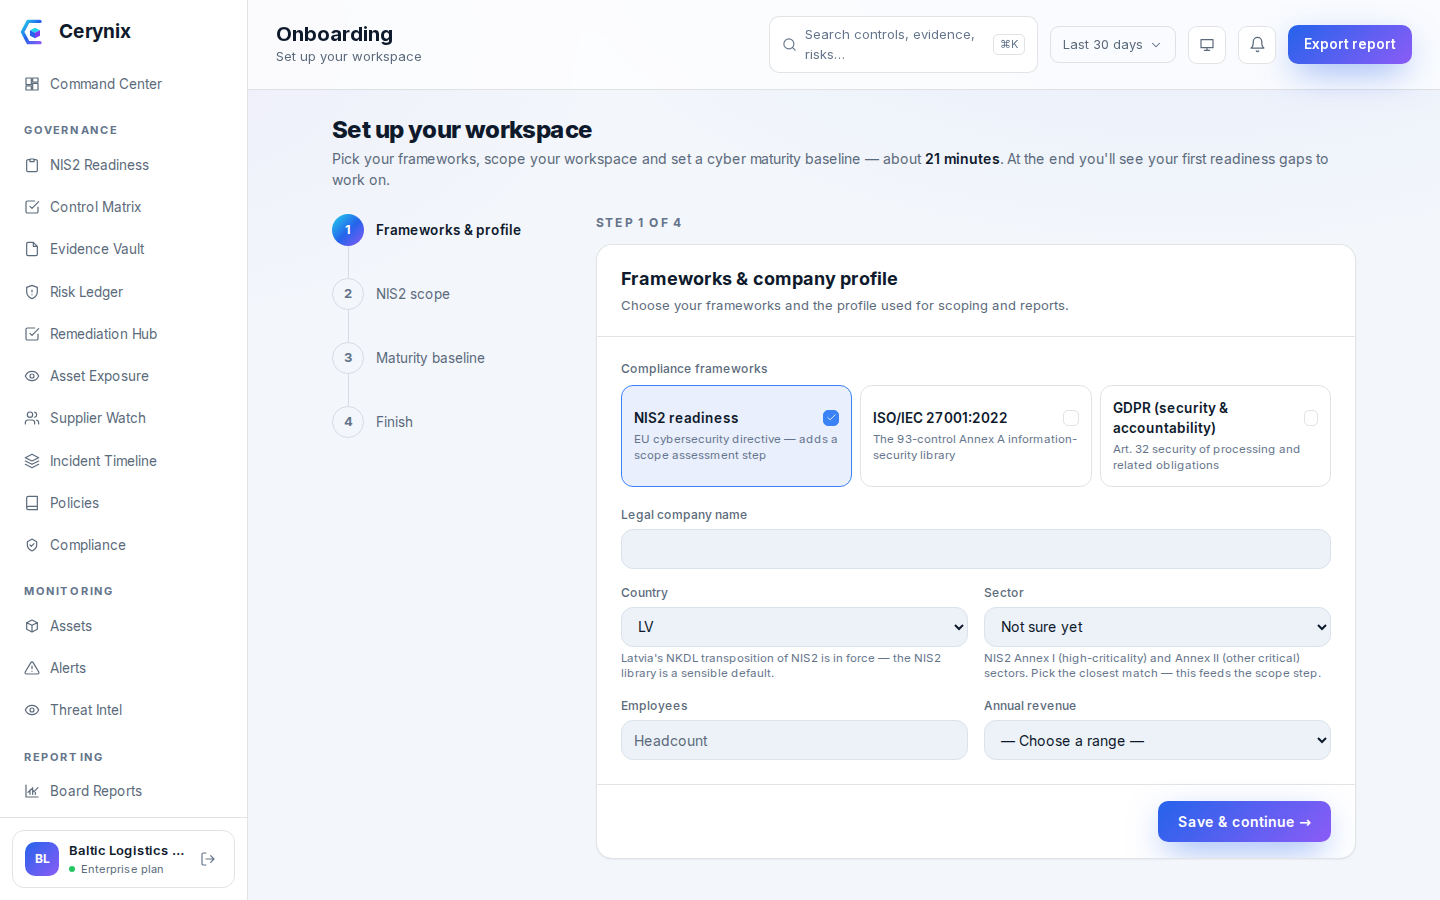
- Step 1 — Frameworks & profile. Fill the company profile (name, sector, employee count) and select your compliance goals — include NIS2 if in scope. Save.
- Step 2 — NIS2 scope (shown only if NIS2 was selected). Answer the scoping questions and run it. Review the result: in-scope yes/no, entity type, confidence, reasoning, recommended next steps. If it flags
requires_legal_confirmation, note it for your legal owner. - Step 3 — Maturity baseline. Answer the baseline questions and submit. Review the overall maturity % across domains.
- Step 4 — Finish. Click finish. This derives the framework libraries from your chosen goals, initializes the control assessments, and marks the org onboarded.
GET /onboarding/status returns onboarding_completed: true and
controls_initialized: true. Navigating to /controls now shows a populated
control library (not an empty list).
Invite users & assign roles
Add your team at Settings → Members (/settings,
“Members” tab). Managing members requires the
members:manage permission — only
admin has it (a CISO can read members but not
manage them). RBAC is enforced on every request.
The five roles
| Role key | Name | What it can do |
|---|---|---|
admin | Organization Administrator | Full access — members, settings, all modules. |
security_manager | Security Manager / CISO | Owns the programme: controls (assess/manage/approve), evidence (write/approve), risk, tasks, suppliers, incidents, connectors, reports, audit read, onboarding. No member/settings/org management. |
it_manager | IT Infrastructure Manager | Executes remediation: assess controls, write evidence, own assets/exposure & tasks, manage connectors. |
auditor | Auditor / Consultant | Read-only across the workspace, plus audit-log visibility and report generation. |
executive | Board / Executive | Oversight: dashboards, reports, control read + approve, risk read + accept. |
Invite each user
- Click Invite member, and enter the email, full name, chosen role, and a temporary password (min 10 characters).
- If the email is new, a user is created (consuming a license seat — checked against the edition's
max_users). If it already exists on the instance, they are added to this org (a duplicate membership is rejected). - Communicate each temporary password over a secure channel; instruct users to change it and enrol MFA.
Each invited user appears in the Members table with their role; a
member.invited audit event is recorded. Recommended minimum for a pilot:
1 admin (MFA on), >=1 security_manager (CISO), optionally 1 it_manager, and
1 auditor and/or executive for read/report access.
Connect your first connector
Populate your inventory and findings from a real source at
Integrations (/integrations). Creating a
connector requires connector:manage (admin, CISO, or
IT manager). The catalog is served from
GET /connectors/catalog.
Pick a connector
| Category | Kinds |
|---|---|
| Import | csv_asset_import, json_asset_import, http_json (Generic HTTP/JSON) |
| Identity | entra_id (Microsoft Entra ID) |
| Endpoint / XDR | intune, defender, forticlient_ems, trend_vision_one |
| Network / Logging | fortigate, fortianalyzer |
| Vulnerability | tenable (Tenable / Qualys) |
| Patch / Monitoring / SIEM | action1, zabbix, splunk |
| Infrastructure / ITSM | vmware (vCenter), jira |
destination resolves to a non-public address.
| Connector | Reaches | Needs the setting? |
|---|---|---|
entra_id, intune, defender | fixed Microsoft cloud hosts | No — work out of the box |
csv_asset_import, json_asset_import | an uploaded file | No — no network at all |
tenable, action1, trend_vision_one, jira | vendor cloud or your own server | Only for the self-hosted variant |
fortigate, fortianalyzer, forticlient_ems, zabbix, splunk, vmware, http_json | your network, by nature | Yes |
.env and restart the api, scoped to
what you actually integrate with:
CONNECTOR_ALLOWED_CIDRS=10.20.0.0/16,192.168.213.0/24169.254.169.254 metadata endpoint), unspecified and
multicast stay blocked even if a range you list covers them. Every
permitted internal destination is recorded on the connector run
(summary.internal_egress_allowed), so the egress is
auditable rather than invisible.
Easiest first connector: a CSV/JSON asset import or Generic HTTP/JSON — no third-party credentials needed — to populate the asset inventory quickly. For a live source, Entra ID or Defender demonstrate real value.
Create, test, run
- Create the connector with a name,
kind, optional schedule, config, and — for live vendors — the secret credential (stored encrypted; unknown kinds are rejected). - Test the credentials without a full sync — validates connectivity and reports latency; no run is recorded.
- Run it — for import connectors upload the file; for live vendors it pulls on demand.
The latest run shows status "succeeded" with non-zero imported asset/finding
counts. New assets appear under Assets/Exposure (/assets, /exposure) and any
findings under Alerts (/alerts). Every connector action is audited.
The core GRC loop
This is the day-to-day cycle. Walk it once end-to-end to confirm the instance is fully working; each screen renders populated with your reference data.
Control → evidence → approval
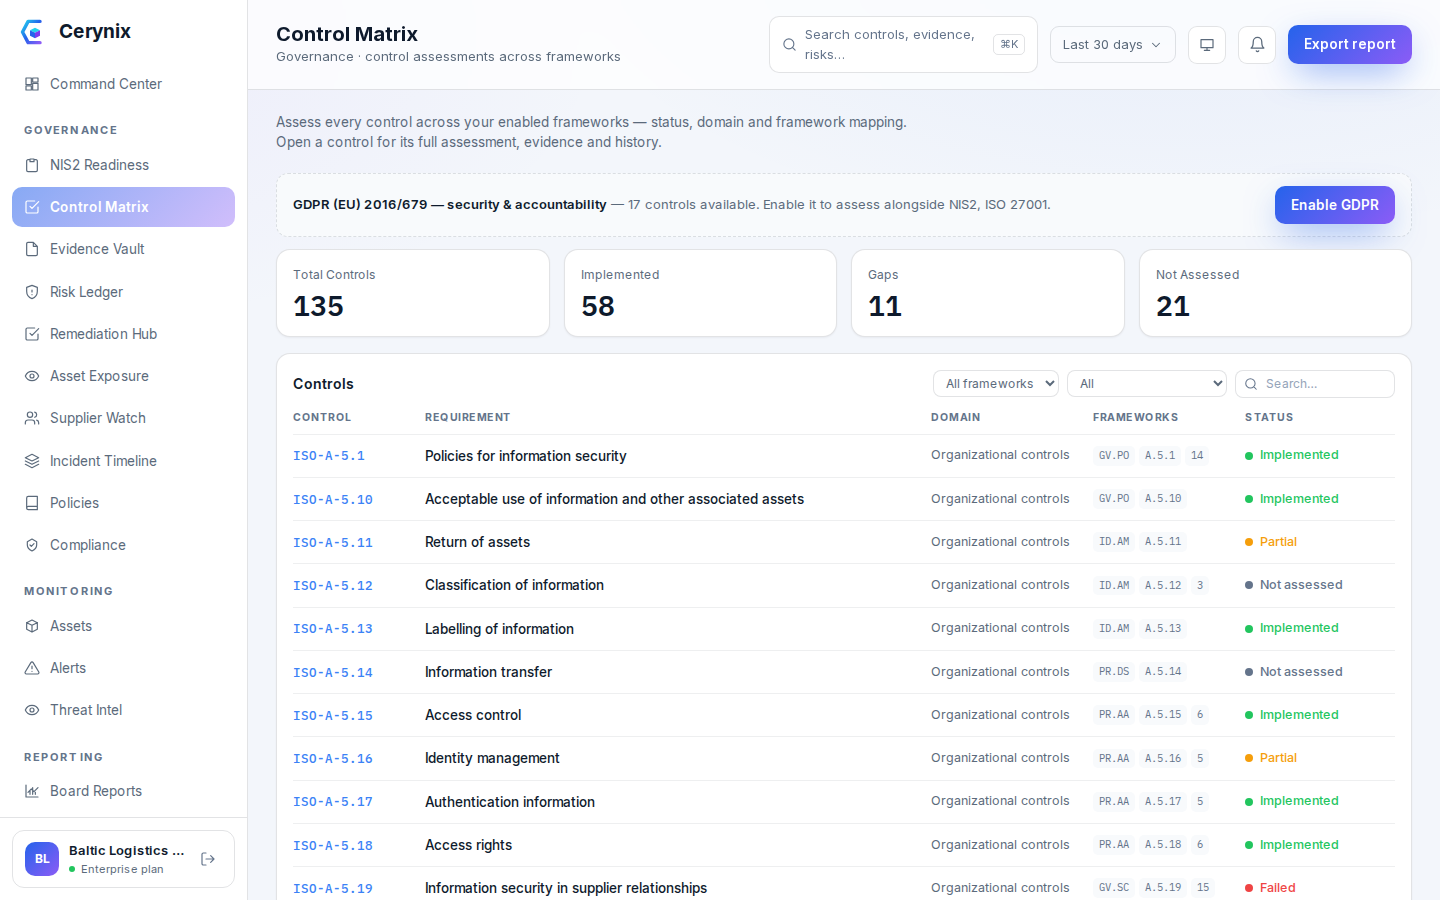
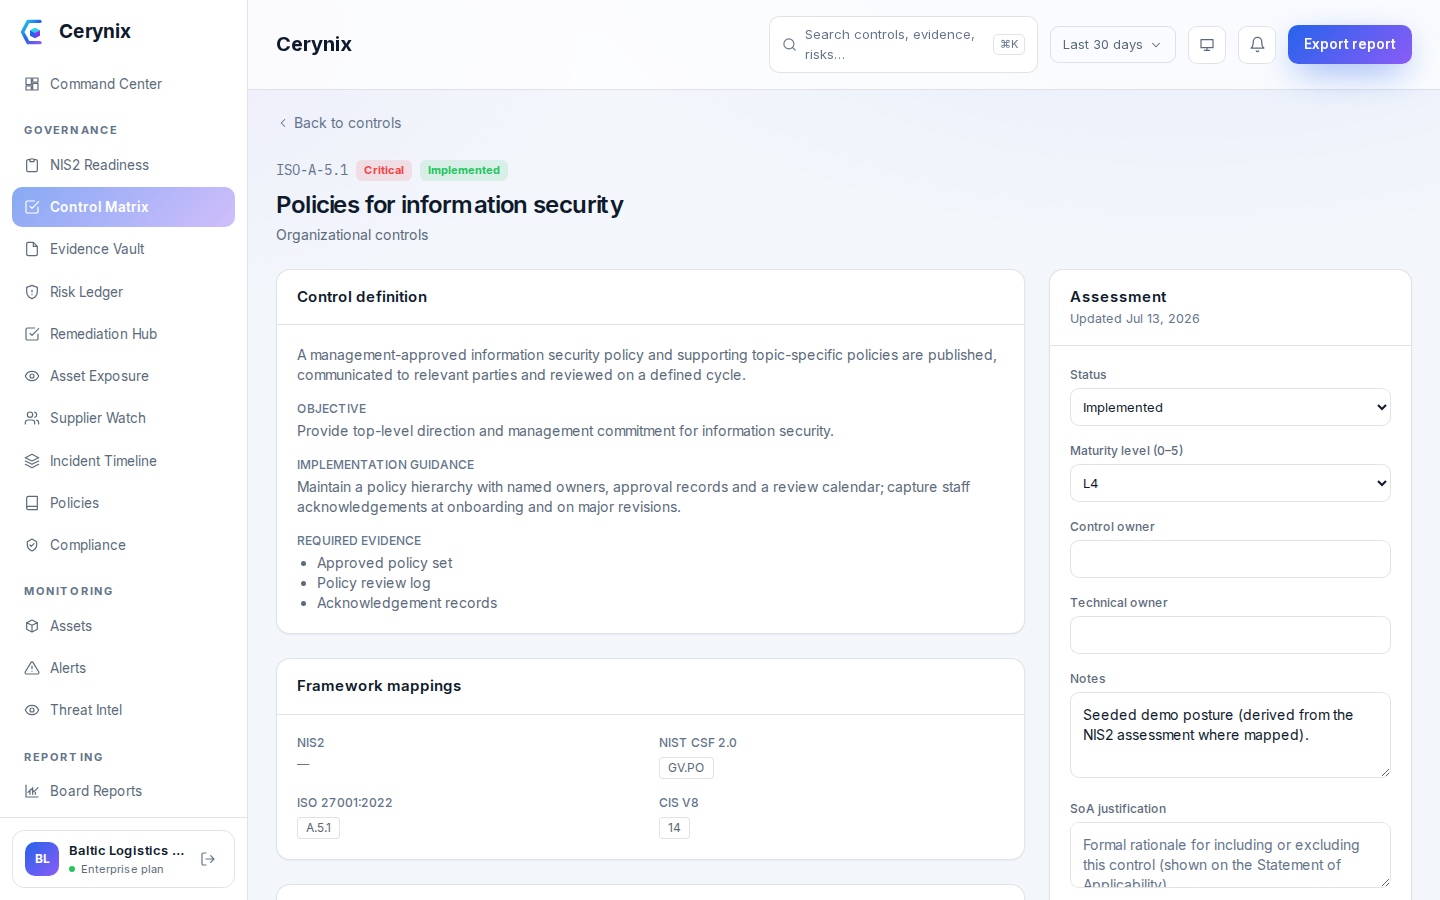
- Assess a control. Open Controls (
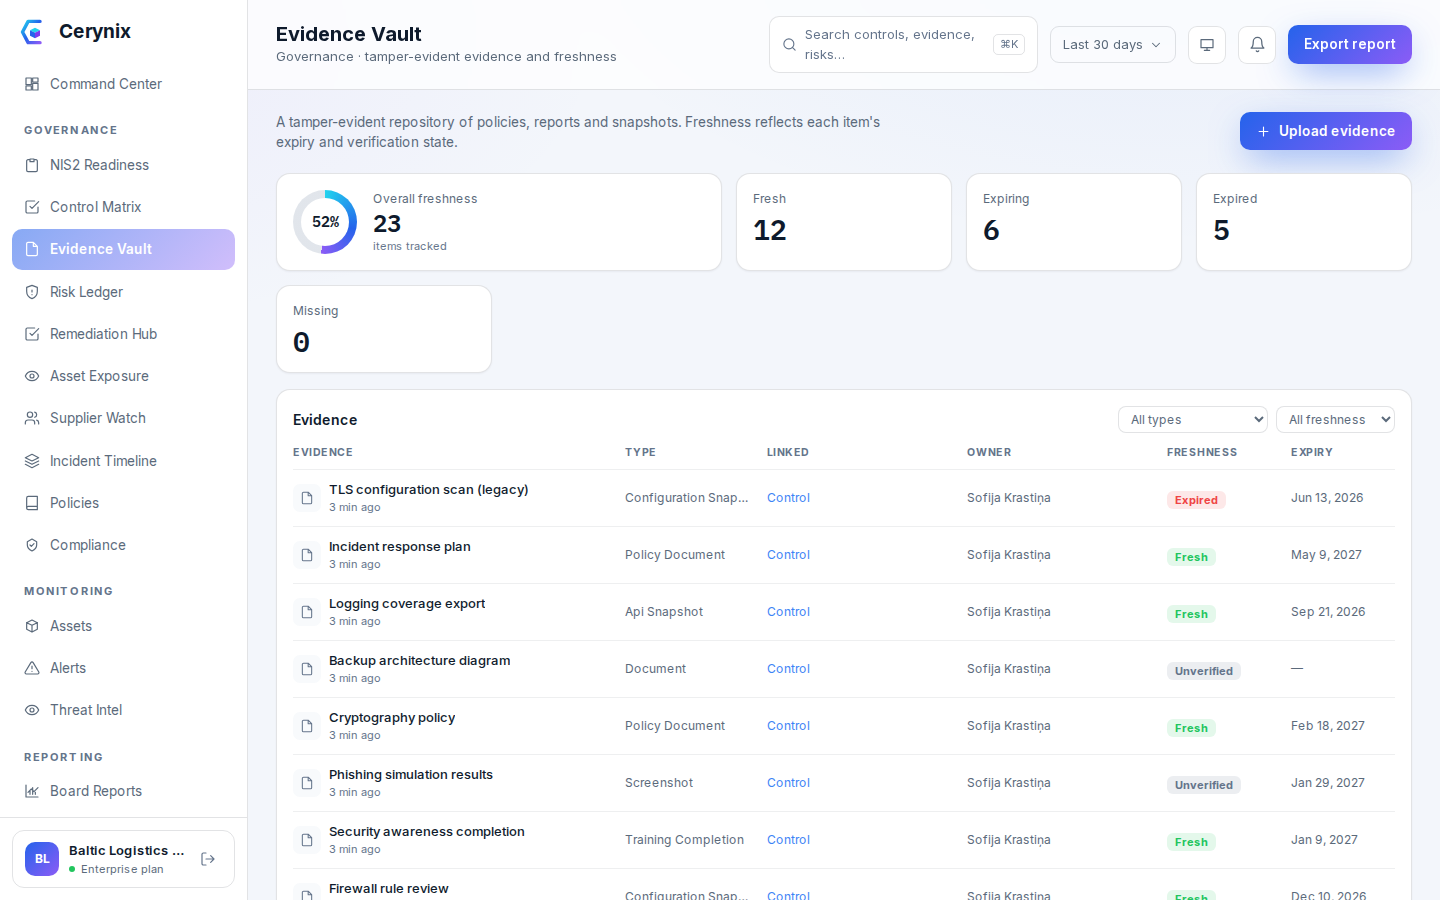
/controls), open a control, set an assessment status + maturity level and save (needscontrol:assess). - Upload evidence. Open Evidence (
/evidence), upload a file with a title, confidentiality level and personal-data flag (needsevidence:write). The file is hashed (SHA-256) and stored. - Link the evidence to the assessed control.
- Approve the evidence (as admin or CISO,
evidence:approve), then approve the control assessment (control:approve).
Assessment saved with a computed next_test_date; evidence created (201) and
linked; approving recomputes the control's evidence freshness. Setting a
control flagged "critical" to a failing status auto-creates a remediation Task
and emits a control.failed event. Every step writes an audit event.
Risk → task
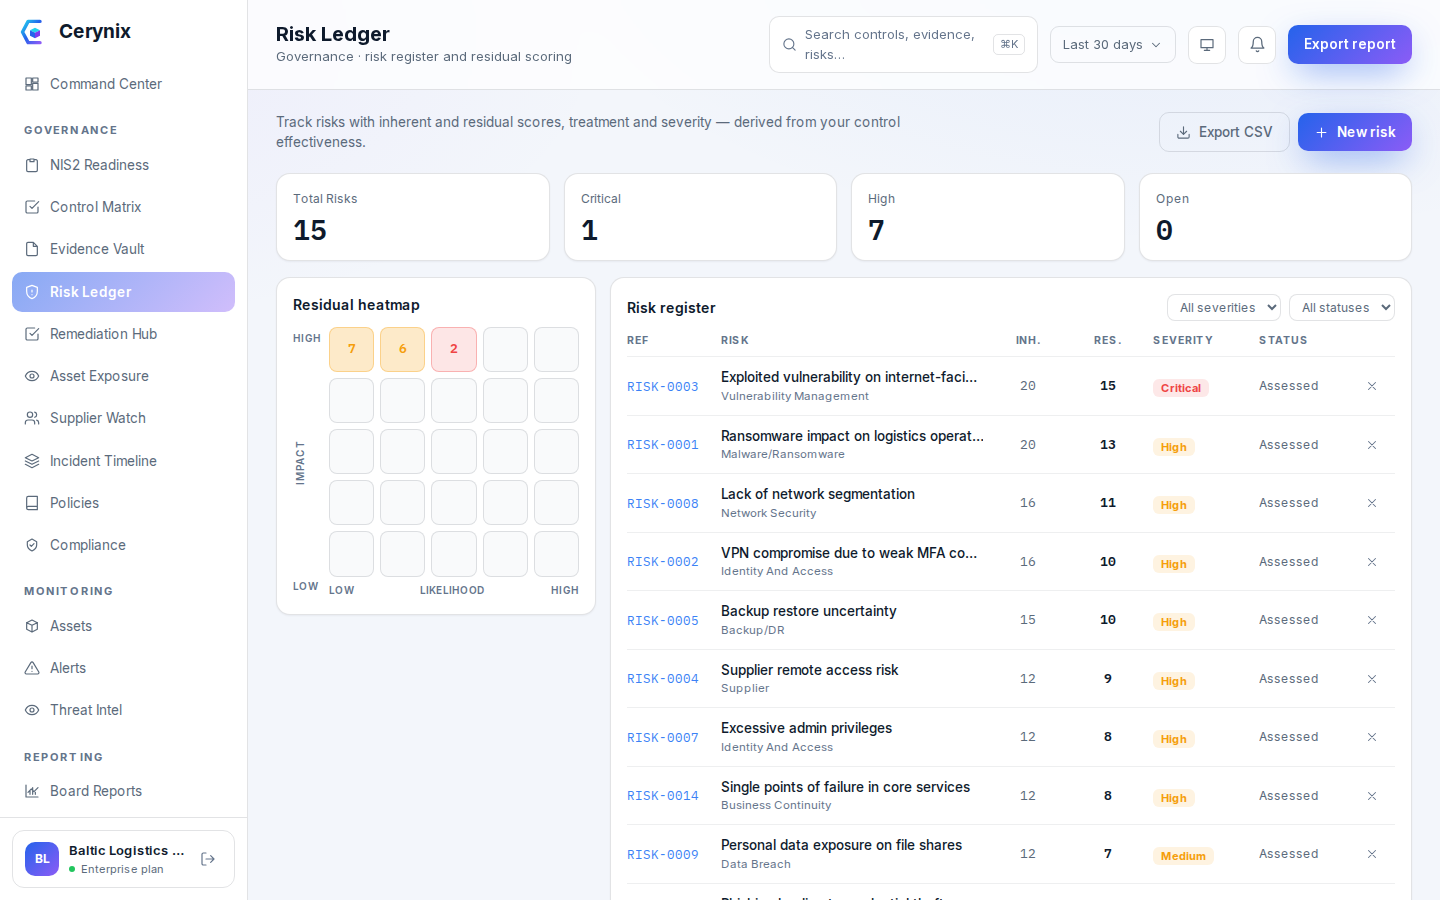
- Open Risks (
/risks) and create a risk with likelihood/impact and a treatment (needsrisk:write). - Create a remediation Task (
/tasks) linked to that risk (and optionally to a control). - Update the task status as work proceeds; optionally accept a risk (
risk:accept).
Risk created with a generated reference and computed inherent/residual scores;
a residual score >= 15 emits a "High residual risk" notification. The task gets
a TASK- reference linked to the risk; status changes persist and are auditable.
Incident timeline (NIS2 reporting)
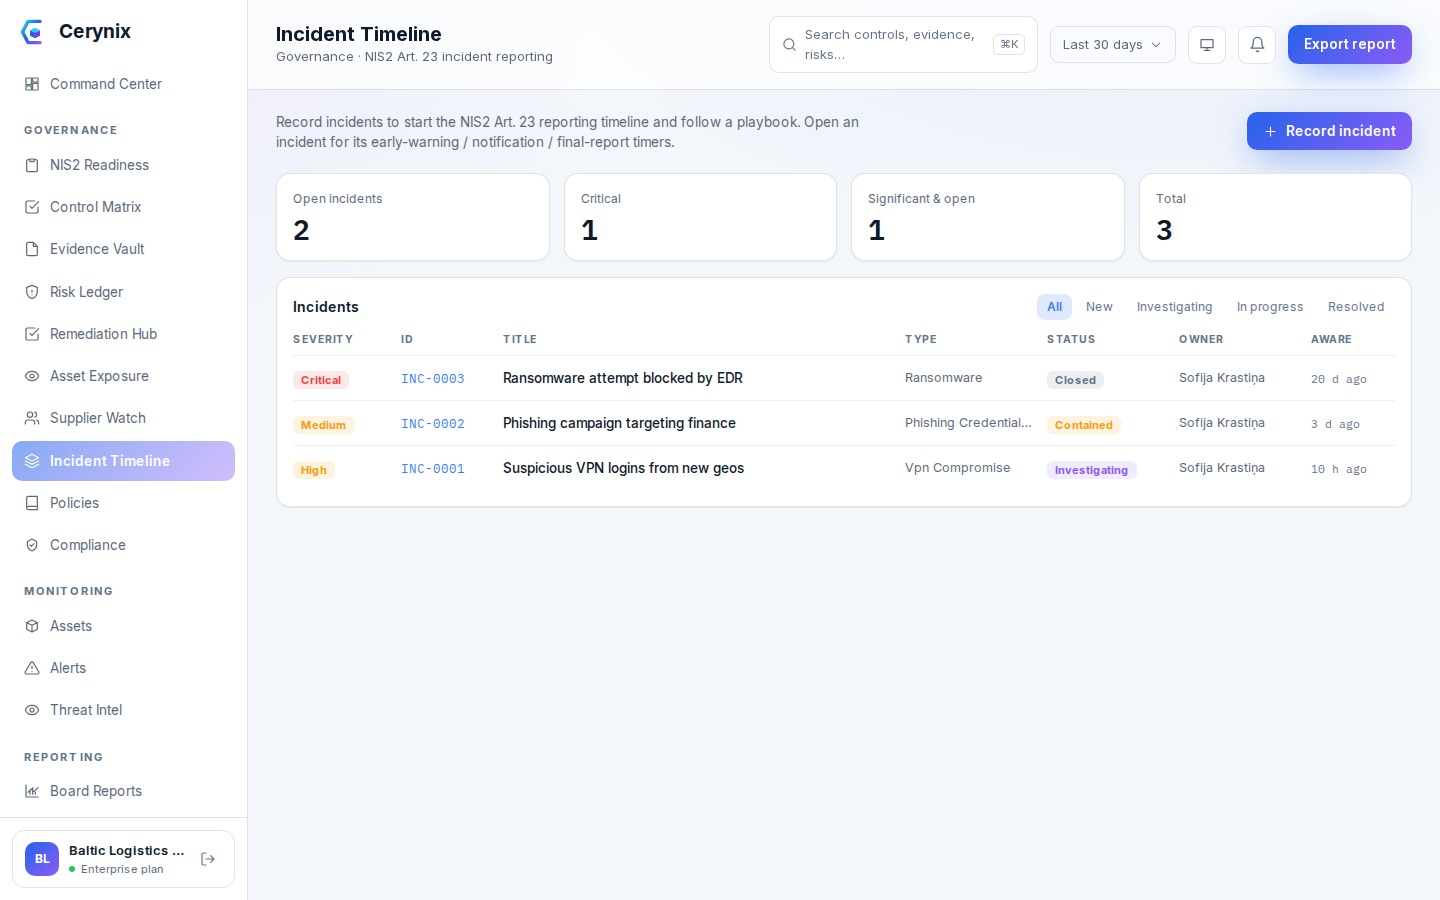
- Open Incidents (
/incidents); optionally review the available playbooks. - Create an incident with a severity (needs
incident:write). - Open the incident detail, then add timeline events and update its status as it evolves.
Incident created with an INC- reference; a "created" timeline event is
auto-added and a "NIS2 reporting clock started" notification is emitted. The
detail shows a computed NIS2 reporting section (deadlines derived from the
incident), the ordered timeline, and the linked playbook if one is set.
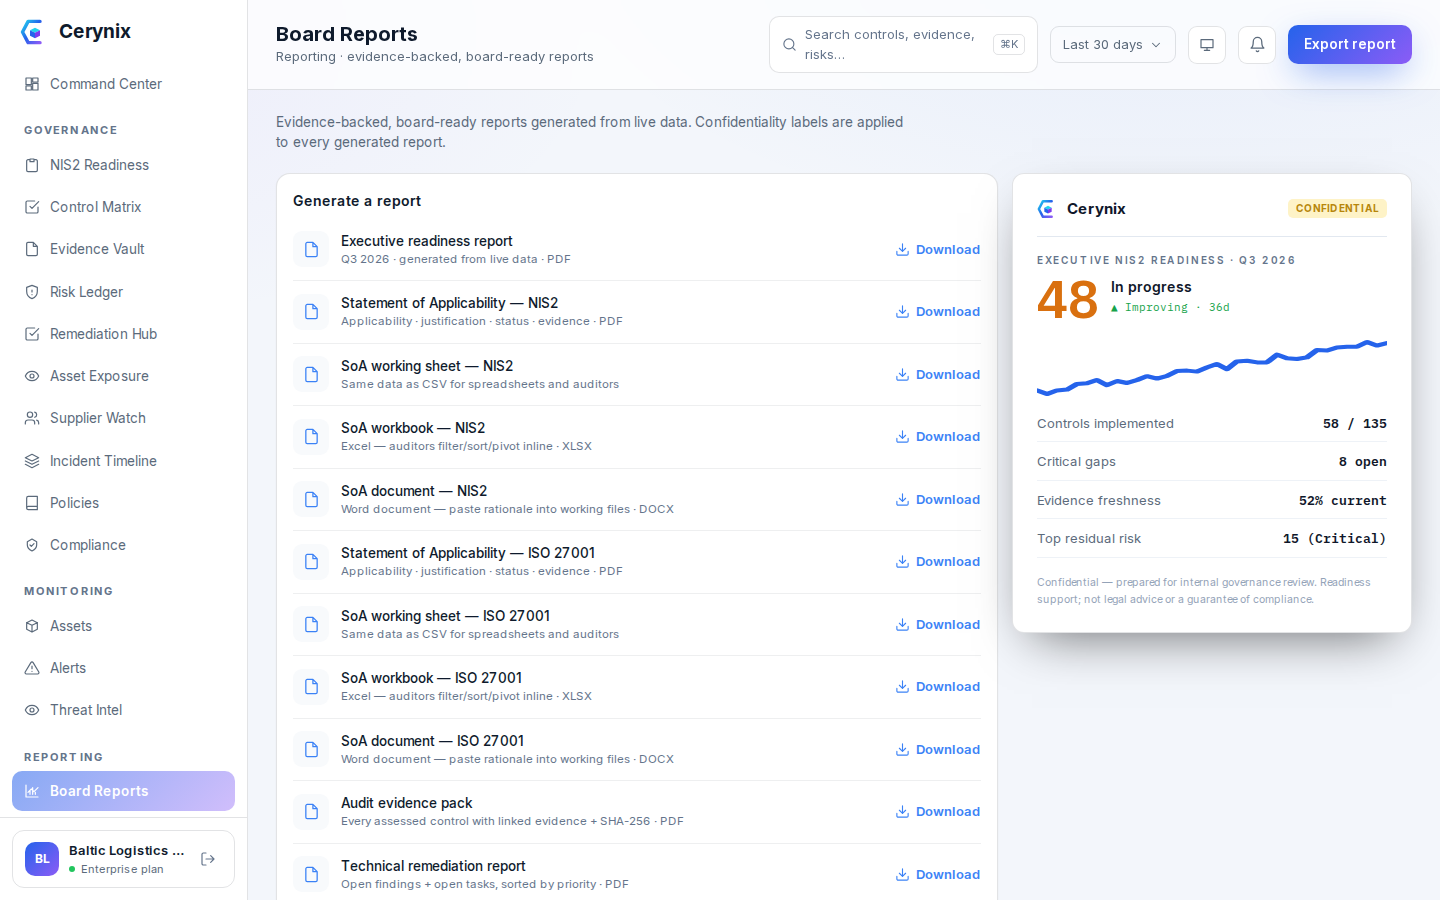
Generate SoA & board reports
Open Reports (/reports);
GET /reports lists the available types. Generate the
Statement of Applicability (PDF, and also CSV / XLSX / DOCX), snapshot a
SoA version, and generate the Executive readiness PDF and the
audit-evidence / technical-remediation / supplier-risk / country-profile PDFs.
Report generation needs report:read /
report:generate.
Each requested file downloads and opens, reflecting the org's current data
(controls, evidence, risks). SoA versions can be created, listed and exported.
Backups
Backups are client-side age-encrypted before touching disk
(backup.sh aborts if
BACKUP_AGE_RECIPIENT is unset, so it can never write
plaintext):
cd /opt/cerynix/app
scripts/backup.sh # -> backups/<timestamp>/{db.sql.gz.age,evidence.tar.age}BACKUP_SCHEDULE_HOUR
(default 02:00 UTC) with retention from
BACKUP_RETENTION_DAYS. You will find artifacts under
Settings → Backups that you did not create by hand — that is the
schedule working, not a surprise. This page used to tell you to add a crontab
entry, so an operator following it ended up with two backups a night; the first
pilot client noticed the unexplained artifacts and reported it (D-17).
Add a crontab entry only if you deliberately want a second, independent schedule — for example dumps taken from outside the container lifecycle:
30 2 * * * cd /opt/cerynix/app && bash scripts/backup.sh >> /var/log/cerynix-backup.log 2>&1Treat a restore as a controlled disaster-recovery operation. First validate it in an isolated environment; do not overlay a running production database without a maintenance window and a rollback plan. The restore needs the off-box private identity you stored in Phase 1:
BACKUP_AGE_IDENTITY=/path/to/cerynix-backup.key \
  scripts/restore.sh backups/<timestamp>
Follow the complete backup and disaster-recovery runbook before restoring production.
BACKUP_AGE_IDENTITY=/path/to/cerynix-backup.key scripts/restore-drill.sh.
And copy backups off-box (see scripts/backup-r2.sh) — a backup only
on the same VM is not a backup.
Updating to a new release
One command, in your install directory. It backs up the database, snapshots the current version, downloads the latest release, rebuilds, and runs the browser-facing self-test. Your data, activated license and TLS certificate are preserved — they live in Docker volumes / the database, which the rebuild never touches. If the new build fails its self-test, the installer attempts to restore the previous application snapshot. That is not a database rollback: after a schema migration, older application code may no longer be compatible. Keep the pre-upgrade database backup and use the recovery runbook when a migration was applied.
Before production changes, follow the safe upgrade runbook, including maintenance, backup verification and the schema-aware recovery decision.
cd ~/cerynix-onprem      # your install directory ($CERYNIX_HOME)
./install.sh --update
When it finishes you will see Update complete and a
browser-facing SELF-TEST: PASS. A rollback snapshot
(.cerynix-prev-*.tgz) and a DB backup are left in the
directory; delete them once you are happy.
--update command
existed, do the first update manually — this also lands the new installer, so every
update after it is the one-liner above:
cd ~/cerynix-onprem
curl -fsSL https://dl.cerynix.com/cerynix-onprem.tar.gz | tar xz
./install.sh --repairTroubleshooting
docker logs cerynix-api-1 shows
password authentication failed for user "cerynix_app", you
reinstalled over an existing database volume. Just run the repair — it reconciles the
database role with your .env and restarts cleanly:
cd ~/cerynix-onprem
./install.sh --repairdocker compose -f docker-compose.yml -f docker-compose.prod.yml down -v
then re-run the installer.